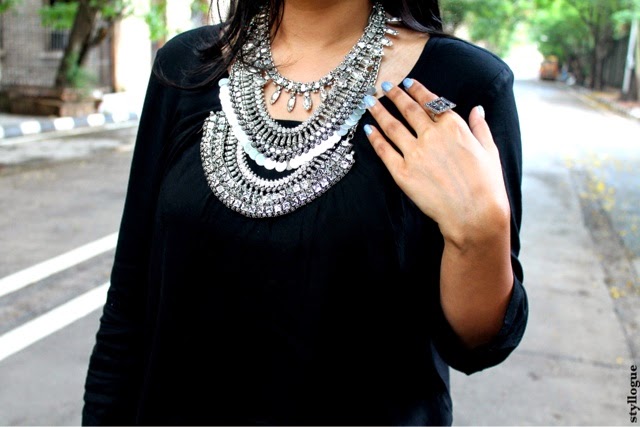
How to : Stack Statement Necklaces
I am very fond of accessories statement necklaces,rings and all other type of accessories.While I have been mostly flaunting statement rings on the blog I am very fond of statement neck pieces also.This post is entirely dedicated towards my love for accessories I would rather say chunky necklaces.
And of course when stacked silver necklaces are talked about one cannot ignore DylanLex silver necklaces.Even before I was introduced to these dylanlex statement necklaces I was very fond of such type of silver jewellery. Around the globe, this type of jewellery can be found in many cultures Indian, African, Tibetan, Turkish etc each having their distinctive cultural traits in the designs.In India such jewellery is more popular in Gujarati and Rajasthani cultures and also few northern regions.
Here I have layered four necklaces out of which two are DIYs necklaces.I have been working on the two DIY necklaces for more than a month now and have worked really hard on them and that's why this post is very close to my heart. Assembling them did take a lot of time, but finding the right pieces took ages.Both the DIY necklaces are made from anklets and not from necklaces.I found it easier to work with anklets instead of necklaces.I went for Diy necklace because I had this particular design in mind and I didn't want to compromise on the design and that is the essence of such necklaces.You need to have a specific design in your mind.
I really like this concept of stacked jewellery. Stacking jewellry is a delicate art form.There has to be a symphony of necklaces, uneven necklaces will just look garish and bizarre. Previously I have tried stacked rings and now I am trying my hand at stacked necklaces.Here is a quick crash course on how I have stacked these necklaces.
The base : Decide you base necklace carefully. The base necklace and the second necklace have to be a winner. It does not matter if you layer anything above or below these two necklaces will pave the way for the remaining necklaces.
Necklace 1 : Diy necklace made with anklets.
Necklace 2 : The coin necklace this one is a proper necklace and is borrowed from dear Mom's closet.
Necklace 3 : Diy necklace made from anklets.I have disfigured it so much that no one can tell these were anklets once.
Necklace 4 : Now even though this necklace goes on the top it is not the base necklace its like adding garnish to a dish just to complete the look.Is have altered the length of the chain so that it fits exactly before the base necklace.
One advice I would give for picking up such silver necklaces that is look for detailing on it.The design on the necklaces is what steals the show.While layering alter the lengths in case some necklace is not according to the required length.
So here you have some major stacked statement necklaces.And stack only that many necklaces you are comfortable with because it can get really heavy.The Diy necklaces have turned out better than I had expected and I will keep sharing different combinations with these necklaces on Instagram.


